


Since 2021, Google’s Mobile Vision library has been deprecated and is no longer being maintained. So as an Android developer, I started to evaluate whether to migrate existing code. One of our App Solutions Studio clients had a QR code functionality in one of their applications, on which a redesign was due, so it seemed like the perfect time to improve the code and analyze alternatives.
So what should we use instead? In comes ML Kit, Google’s new set of libraries which includes the previous Mobile Vision library functionalities.
Why should we change?
Sometimes, as developers, we wonder why we should modify existing features which work completely fine just because the libraries we use are deprecated. Consider the following:
- Bug fixes. One of the main risks about using a deprecated library is that if you find a bug in it no fix will be provided, risking usability and even the correctness of your application.
- Optimizations. User experience can be severely affected by application performance, and libraries which put constraints on it. Generally this can only be resolved by manually modifying the source code (which can sometimes be impossible due to licensing) or official releases.
- Loss of functionality. Once a library or piece of code is set as deprecated, this means it will be removed eventually which could lead to unwanted loss of functionality.
- Finally getting rid of those pesky warnings or suppressed warnings. While we can always just ignore the benefits and decide to keep a deprecated library, modern IDE’s will take it upon themselves to tell us when we could use a newer and supported one.
So how do I use ML Kit’s Barcode library?
The first thing we need to do is add the dependency into our module’s build.gradle file. You can both bundle the model into your application or download it via the Google Play Services.
// Bundle the model
implementation 'com.google.mlkit:barcode-scanning:17.0.3'
// Download the model
implementation 'com.google.android.gms:play-services-mlkit-barcode-scanning:18.1.0'
Personally, I prefer using the bundling dependency as there’s no need to have an extra download via Play Services which makes it more likely to encounter exceptions because of the module not being downloaded. If you prefer to use the latter, you can force the model to be downloaded once the application is downloaded via the Play Store as such:
<application ...>
    ...
    <meta-data
        android:name="com.google.mlkit.vision.DEPENDENCIES"
        android:value="barcode" >
</application>
After this, we need a class which will do as our QR code scanner:
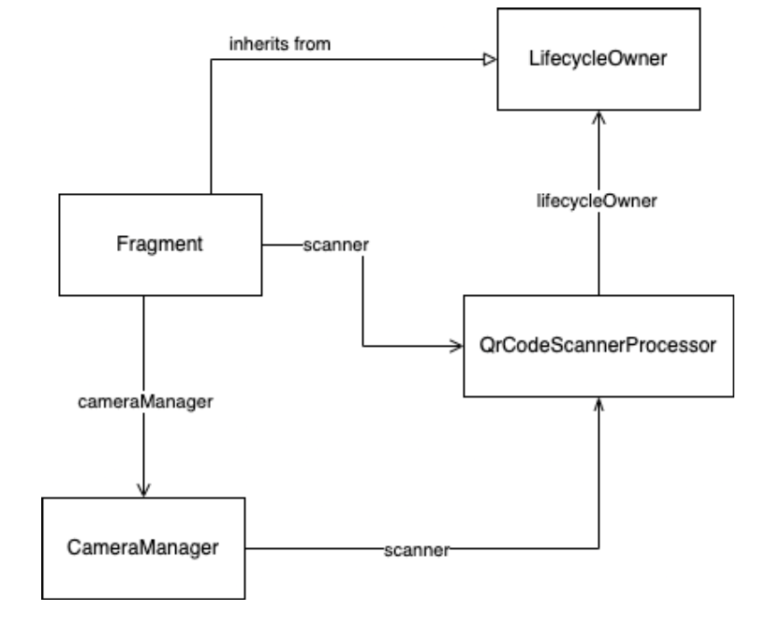
class QrCodeScannerProcessor(
    private val lifecycleOwner: LifecycleOwner
): ImageAnalysis.Analyzer {

    private val options =
        BarcodeScannerOptions.Builder()
            .setBarcodeFormats(Barcode.FORMAT_QR_CODE)
            .build()
    private var scanner: BarcodeScanner? = BarcodeScanning.getClient(options)
    private var isProcessingCode = false

    override fun analyze(imageProxy: ImageProxy) {
        if (!isProcessingCode) {
            val mediaImage = imageProxy.image
            mediaImage?.let {
                isProcessingCode = true
                detectInImage(
                    InputImage.fromMediaImage(
                        It,
                        imageProxy.imageInfo.rotationDegrees
                    )
                )
                ?.addOnSuccessListener {results ->
                    onSuccess(results)
                }
                ?.addOnFailureListener { e->
                    onFailure(e)
                }
                ?.addOnCompleteListener {
                    imageProxy.image?.close()
                    imageProxy.close()
                }
            }
        }
    }

    private fun onSuccess(results: List<Barcode>) {
        if(results.isNotEmpty()) {
            // Any extra actions should be done here, for example, vibrating the phone
            results[zero].run {
                rawvalue?.trim()?.let { obtainedString ->
                    (lifecycleOwner as BaseQrReadFragment).readQr(obtainedString)
                    stop()
                }
            } else {
                isProcessingCode = false
            }
        }

        private fun onFailure(e: Exception) {
            // Handle the exception per your needs
        }

        fun detectInimage(image: InputImage): Task<List<Barcode>>? {
            return scanner?.process(image)
        }

        fun stop() {
            try {
                isProcessingCode = false
                scanner?.close()
                scanner = null
            } catch (e:IOException) {
                bcpLogException(e)
            }
        }
    }
}
How does this code work?
- Set up the Barcode Scanner options. In this case we only want our application to scan QR codes therefore we only add to our options instance the FORMAT_QR_CODE constant.
- Create a BarcodeScanner instance. Here we pass the options we previously created to the getClient() function.
- Define a flag to avoid constant analysis. The scanner constantly catches frames therefore the flag avoids processing all of those new frames while one is already being analyzed.
- Handle the success, failure and completion of the detection. Here, our preferred way to handle them is via auxiliary functions instead of having too much code in an already big function (that being analyze()).
- On a successful detection, we vibrate the phone (to give physical feedback that the detection has been done) and then obtain the detected value, clean up and handle it (which in our case consists of displaying the value).
- On failure detection, we show an error message. But considering this can change from application to application, our onSuccess() function is empty here.
- After either a failure or a success, we then clear some resources pertaining to the scanned frame.
- Stop the processing. In our stop() we then reset the flag, close the scanner and set its variable to null. Since we change fragments to display the scanned QR, it makes sense to release the resources after a successful detection, this might not be the case for you.
Then, a fragment/activity can instantiate the scanner and pass it to the following class:
class CameraManager(
    private val finderView: PreviewView,
    private val qrCodeScannerProcessor: QrCodeScannerProcessor,
    private val size: Double
 ) {

    private var preview: Preview? = null
    private var camera: Camera? = null
    private var imageAnalyzer: ImageAnalysis? = null
    private var cameraProvider: ProcessCameraProvider? = null

    private lateinit var cameraExecutor: ExecutorService
    private lateinit var imageCapture: ImageCapture

    init {
        cameraExecutor = Executors.newSingleThreadExecutor()
    }

    private fun setCameraConfig(
        cameraProvider: ProcessCameraProvider?,
        cameraSelector: CameraSelector,
        lifecycleOwner: LifecycleOwner
    ){
        cameraProvider?.unbindAll()
        camera = cameraProvider?.bindToLifecycle(
            lifecycleOwner,
            cameraSelector,
            preview,
            imageCapture,
            imageAnalyzer
        )
        preview?.setSurfaceProvider(
            finderView.surfaceProvider
        )
    }

    fun startCamera(lifecycleOwner: LifecycleOwner, context: Context) {
        ProcessCameraProvider.getInstance(context).also {
            it.addListener(
                {
                    cameraProvider = it.get()
                    preview = Preview.Builder().build()

                    ImageAnalyzer = ImageAnalysis.Builder()
                        .setBackpressureStrategy(ImageAnalysis.STRATEGY_KEEP_ONLY_LATEST)
                        .build()
                        .also {
                            it.setAnalyzer(cameraExecutor, qrCodeScannerProcessor)
                        }

                    val cameraSelector = CameraSelector.Builder()
                        .requireLensFacing(CameraSelector.LENS_FACING_BACK)
                        .build()

                    imageCapture =
                        ImageCapture.Builder()
                            .setTargetResolution(Size(size.toInt(), size.toInt()))
                            .build()

                    setCameraConfig(cameraProvider, cameraSelector)
                },
                ContextCompat.getMainExecutor(context)
            )
        }
    }

    fun unbindAll() {
        cameraProvider?.unbindAll()
    }
}
This works as follows:
- Create an executor. Once an instance of this class is created, a new executor is initialized where all the functionalities are executed.
- Initialize all internal variables needed. This is done on the startCamera() function, which is called by the fragment/activity which instantiates the class. Here we set up the camera selector, the analyzer and the image capture.
- Tie everything up with the view. We add all the previously created options variables to the camera instance and then set the previewView to be that in the view.
Both the CameraManager and the QrCodeScannerProcessor are then used by a fragment whose responsibility is to display a preview of the camera and provide the user with the capacity to load a QR code from the gallery. It does so via the following bits of code:
- PreviewView.
<androidx.camera.view.PreviewView
    android:id="@+id/previewView"
    style="@style/Base.ContainerWithoutPadding" />
This XML code adds the view in the fragment which we previously connected to the Camera.
- Camera detection.
private fun initialiseDetectorsAndSources() {
    try{
        scanner = QrCodeScannerProcessor(this)
        val displayMetrics = DisplayMetrics()
        activity?.windowManager?.defaultDisplay?.getMetrics(displayMetrics)
        val size = displayMetrics.widthPixels * displaySize
        cameraManager = CameraManager(
            requireContext(),
            previewView,
            this,
            scanner!!,
            size
        )
        cameraManager?.startCamera()
    } catch (e: Exception) {
        if (e is IllegalArgumentException) {
            if (openCameraAttempts < two) {
                releaseResources()
                showMessageRetry(
                    getString(R.string.transfer_qr_camera_unavailable),
                    {
                        initialiseDetectorsAndSources()
                    },
                    fullscreen_content
                )
            } else {
                showMessage(R.string.transfer_qr_camera_unavailable)
            }
        }
        openCameraAttempts++
    }
}
Here, we create a new scanner instance, set the size of the preview to use and use them to create a new CameraManager. On this new CameraManager we call its startCamera() function. This call can throw exceptions which we catch here, specifically, IllegalArgumentException which is thrown if the user’s rear camera isn’t available. In our case, we allow the user only two attempts to access the camera but it’s really up to you and your application’s own necessities.
- Scanning directly from the gallery.
override fun processQr(bitmap: Bitmap) {
    scanner?.let {
        it.detectInImage(InputImage.fromBitmap(bitmap, zero))
            ?.addOnSuccessListener { results ->
                if (results.isNotEmpty()) {
                    results[zero].run {
                        rawValue?.trim()?.let { obtainedString ->
                            readQr(obtainedString)
                            scanner?.stop()
                        }
                    }
                } else {
                    showMessage(getString(R.string.transfer_qr_gallery_invalid))
                }
            }
            ?.addOnFailureListener { e ->
                if (e is MlKitException && e.errorCode ==
    MlKitException.UNAVAILABLE) {
                    showMessage(getString(R.string.transfer_qr_model_downloading))
                } else {
                    showMessage(getString(R.string.transfer_qr_gallery_invalid))
                }
            }
    }
}
This code follows a similar structure to what we saw previously on the scanner. The only difference is that we catch an MlKitException with the errorCode being MlKitException.UNAVAILABLE which would mean that the Barcode Module is not available. While this might sound unnecessary considering the module is bundled, in practice we have found that even with the bundled dependency, some users experience this exception.
- Resource Management.
override fun onDestroyView() {
    super.onDestroyView()
    releaseResources()
}

private fun releaseResources() {
    scanner?.stop()
    cameraManager?.unbindAll()
    cameraManager = null
    scanner = null
}
Here, we handle how to release the resources once the view is destroyed, hence tying the resources with the lifecycle of our fragment.
Here’s how it all looks:
Conclusion
ML Kit provides us with a suite of libraries which facilitate facial detection, image labeling, barcode scanning and many others. In this blogpost we went through an example of how to use Barcode Scanning for QR codes. Some of the advantages we saw are:
- Constant improvements to the codebase.
- Continuous support.
- Ease of integration (since it’s a Google developed library).
- Constant bug fixes.
- Available for iOS (symmetry between application versions).
In a future blog post we’ll see how ML Kit compares to Mobile Vision and further expand on some of the benefits of the former. Hopefully with this post you’ll decide to use ML Kit in your current or future projects, see you in the next post!