


When designing user interfaces, we often receive requests for components or designs that go beyond what we can achieve with plain components. This is where Canvas comes in to help us.
With Canvas, we have the ability to decide what to draw on a screen, even behind components that have already been drawn. This powerful tool allows us to create more complex and dynamic interfaces. In this article, we’ll discuss how we utilize Canvas to create design elements that fit our client’s needs.
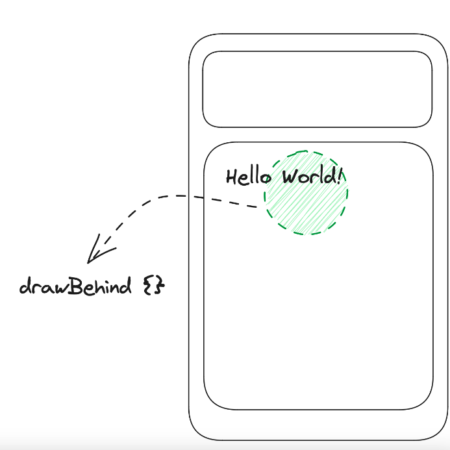
Basically, Canvas provides an API DrawScope which allows us to draw elements on the screen using the coordinate system relative to the current container. This last part is key, in case we need to make a component such as the following:
Column(modifier = Modifier.fillMaxWidth().height(256.dp)).drawBehind {
    // this.size.y == 256.dp.toPx()!
}
Our coordinate system (x, y) will be relative to the position of the column and its size.
These basic steps are covered in this video and in the official Documentation.
It is strongly recommended to take a look into those videos before trying the following examples.
Interactive Canvas components
One interesting thing about Canvas is its flexibility. Imagine a situation where we’d like to create a component that is draggable, but only within certain bounds. For example, something like this:

We can incorporate our Canvas composable with the modifier pointerInput to define pointer-type interactions such as tap, drag, transform, and others. In this instance, we want to take advantage of drag events, both horizontal and vertical, but only when the user drags the ends of the clock hands. To simplify, we will envision an invisible circle/square at the end of each hand, which we will refer to as the tap box of the clock hands.
The necessary steps for this task are as follows: create a circle, add time ticks around the circle, draw clock hands, implement drag events for the clock hands, and update our state to accurately reflect the current time.
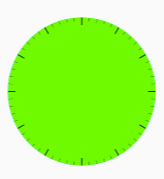
Drawing the circle
This is the easiest part. Inside the DrawScope, we can use the method drawCircle.
Canvas(modifier = Modifier.fillMaxSize()) { // draw scope!
    drawCircle(
      Color.Green,
      // It's very important to reduces the use arbitrary numbers, like 120f
      radius = size.width * .25f,
      center = this.center
    )
}
Drawing the hour & minute ticks
Drawing lines within a circle can be a challenging task. However, by utilizing a little bit of math, the process can become more manageable.
To begin, it is important to remember that a line can be defined by two points.
![]()
By utilizing polar coordinates, we can determine the angle and radius necessary to draw the desired lines within the circle.
![]()
Since we aim to draw 12 lines evenly spaced throughout the circle, it is essential to keep in mind that the distance between each line should be 30 degrees.
for (hourTick in 1..12) {
    val angleInDegrees = (hourTick * 30).toDouble()
    val angleInRadians = Math.toRadians(angleInDegrees)
    drawLine(
        color = Color.Black,
        start = Offset(
            x = center.x + (radius * 0.90f * cos(angleInRadians)).toFloat(),
            y = center.y + (radius * 0.90f * sin(angleInRadians)).toFloat()
        ),
        end = Offset(
            x = center.x + (radius * cos(angleInRadians)).toFloat(),
            y = center.y + (radius * sin(angleInRadians)).toFloat()
        ),
        strokeWidth = 3f
    )
}
Note that we are setting an offset from the center, because it’s the center of our circle.
For the minutes, the process will be similar. We need to calculate the angle distance between each line, which is 30 degrees. Since we are going to draw 4 markers between each line, we need to divide the angle distance by five to ensure that the last marker does not touch the next hour marker. If necessary, an imaginary marker can be added to maintain the desired spacing.
for (hourTick in 1..12) {
    val angleInDegrees = (hourTick * 30).toDouble()
    val angleInRadians = Math.toRadians(angleInDegrees)
    drawLine(
        color = Color.Black,
        start = Offset(
            x = center.x + (radius * 0.90f * cos(angleInRadians)).toFloat(),
            y = center.y + (radius * 0.90f * sin(angleInRadians)).toFloat()
        ),
        end = Offset(
            x = center.x + (radius * cos(angleInRadians)).toFloat(),
            y = center.y + (radius * sin(angleInRadians)).toFloat()
        ),
        strokeWidth = 3f
    )
    for (minuteTick in 1..4) {
        val subAngleInDegrees = 6.0 * minuteTick + angleInDegrees
        val subAngleInRadians = Math.toRadians(subAngleInDegrees)
        drawLine(
            color = Color.Black,
            start = Offset(
                x = center.x + (radius * 0.95f * cos(subAngleInRadians)).toFloat(),
                y = center.y + (radius * 0.95f * sin(subAngleInRadians)).toFloat()
            ),
            end = Offset(
                x = center.x + (radius * cos(subAngleInRadians)).toFloat(),
                y = center.y + (radius * sin(subAngleInRadians)).toFloat()
            ),
            strokeWidth = 1f
        )
    }
}
After that, we should be having the following:
Selecting the time
After creating the base of the clock, we need to create something to represent the clock hands. One way to do this is to draw a circle around the main hand. By using the concepts we have already covered, drawing a clock hand is a straightforward process.
It’s important to note that the order in which we draw elements on a Canvas matters. With this in mind, under the code that draws the ticks we can add the following code to draw the clock hands:
timeSelectorCircleCenter = Offset(
    x = center.x + ((mainCircleRadius + 8.dp.toPx()) * cos(currentTouchAngle)).toFloat(),
    y = center.y + ((mainCircleRadius + 8.dp.toPx()) * sin(currentTouchAngle)).toFloat()
)
timeSelectorCircleRadius = 8.dp.toPx()
drawCircle(
    color = Color.White,
    radius = timeSelectorCircleRadius,
    center = timeSelectorCircleCenter
)
Our current time selector is located at the edge of the main circle. We are looking to add dragging events only for the time selector. To achieve this, we need to determine whether a point (the starting point of the drag event) is inside the time selector. The process involves a bit of math: a point is inside a circle if the distance between them is less than or equal to the radius of the circle. The formula is as follows:
private fun isOnCircle(circleCenter: Offset, point: Offset, radius: Float): Boolean {
    return distance(circleCenter, point) <= radius
}

private fun distance(
    pointA: Offset,
    pointB: Offset
) = sqrt(
    (pointA.x - pointB.x).pow(2) + (pointA.y - pointB.y).pow(2)
)
Now we need to add the dragging event, where we will be interested in overriding the behavior of the onDragStart (to know if the user is dragging at the time selector) and onDrag (to update the current time selector position).
Canvas(
    modifier = Modifier
        .fillMaxSize()
        .background(Color.Black)
        .pointerInput(Unit) {
            detectDragGestures(
                onDragStart = {
                    acceptDragEvent = isOnCircle(
                        timeSelectorCircleCenter,
                        it,
                        2 * timeSelectorCircleRadius
                    )
                }
            ) { change, _ ->
                if (acceptDragEvent) {
                    val touchAngle = Math.toDegrees(
                        atan2(
                            y = change.position.y - mainCircleCenter.y,
                            x = change.position.x - mainCircleCenter.x
                        ).toDouble()
                    )
                    currentTouchAngle =
                        Math.toRadians(if (touchAngle < 0) 360.0 + touchAngle else touchAngle)
                }

            }) { ... }
Here a few things are happening that can be a little tricky to understand.
- First, the drag event is accepted if the initial dragging point is inside the time selector. Here we added an extra value to the radius, to make it easier to drag. This part is very customizable.
- Second, we made use of the atan2 function, in order to know the touch angle.
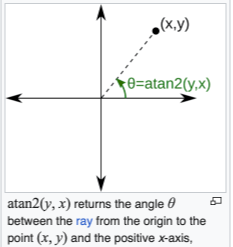
- Lastly, we adjust it to keep it between the ranges of (0,360).
The preceding steps complete the majority of the heavy lifting. Next, you can incorporate logic to identify the currently selected time and other relevant components. It is crucial to analyze the code’s functionality and operation. Make sure to first think of what you want, and then try to model it with code.
Partial result of the code, a full solution is available on GitHub Gist.
Final code with states and how to display the selected hour: Rotation Component Android Compoe
Conclusion
In conclusion, when designing user interfaces, Canvas gives us the ability to decide what to draw on a screen, even behind components that have already been drawn. This powerful tool allows us to create more complex and dynamic interfaces that meet the needs of our clients.
Overall, Canvas allows for greater flexibility in UI design, enabling the creation of more dynamic and interactive interfaces. If you’re interested in taking a look at the work we’ve done, check out our App Solutions Studio webpage.


