


What is BLE?
Bluetooth Low Energy (BLE) is a wireless communication technology designed for low-power devices. Unlike classic Bluetooth, which focuses on continuous data streaming, BLE is optimized for intermittent, low-energy data transmission, making it ideal for IoT devices, sensors, and mobile applications.
Key BLE Concepts
GAP (Generic Access Profile)
GAP defines how BLE devices discover and connect with each other. It handles advertising, scanning, and connection parameters. Devices in BLE can operate in different roles:
- Peripheral: A device that advertises its presence and can be connected to (e.g., a heart rate monitor).
- Central: A device that scans for peripherals and initiates connections (e.g., a smartphone).
Advertising and Scanning
- Advertising: A peripheral device broadcasts small packets of data to announce its presence.
- Scanning: A central device listens for these advertisements to discover nearby peripherals.

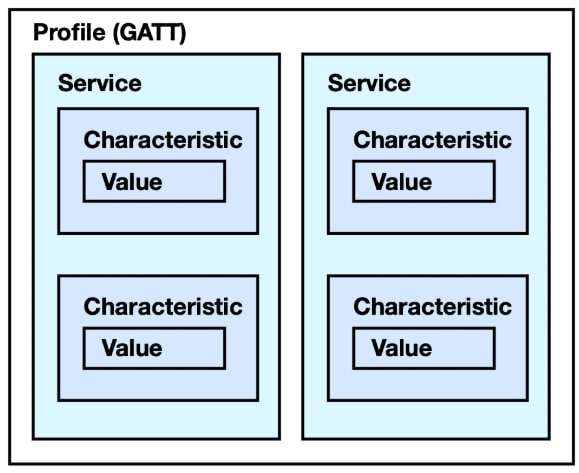
GATT (Generic Attribute Profile)
GATT defines how data is structured and exchanged in BLE. It uses a client-server model:
- GATT Server: Stores and provides access to data.
- GATT Client: Requests data from the server.
GATT organizes data using services and characteristics:
- Service: A collection of related data.
- Characteristic: A single data point that can be read, written, or notified.
UUID (Universal Unique Identifier)
Each BLE service and characteristic is identified by a 128-bit UUID. Standard services have predefined 16-bit UUIDs (e.g., the Heart Rate Service has 0x180D), while custom services require full 128-bit UUIDs.

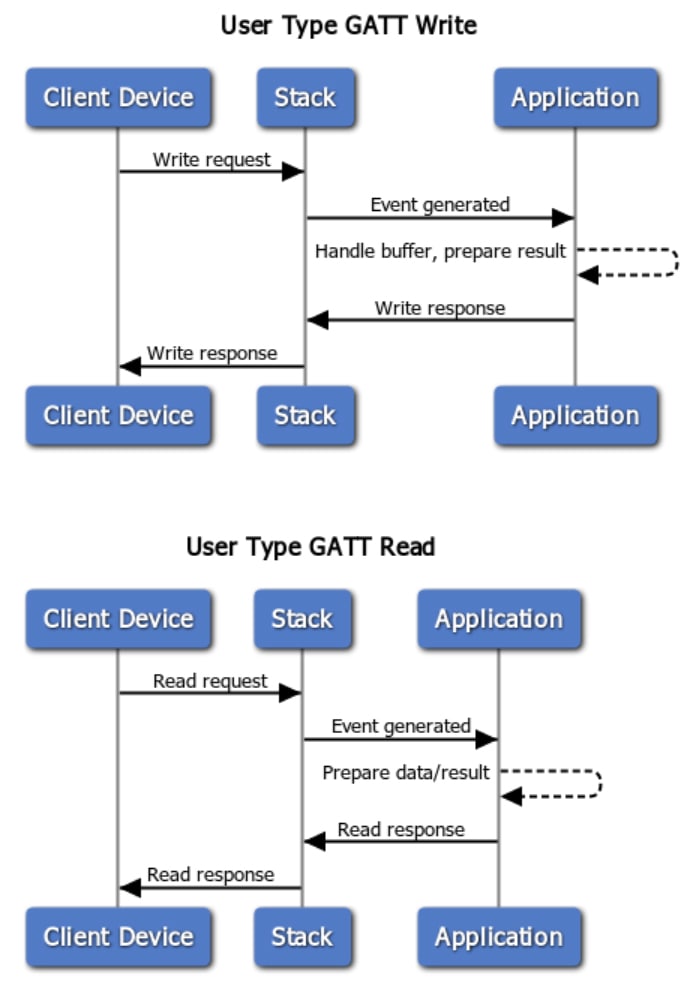
BLE Connection and Data Transfer
After a connection is established, the central device can request data using read, write, or notify/indicate operations:
- Read: The central requests data from the peripheral.
- Write: The central sends data to the peripheral.
- Notify/Indicate: The peripheral pushes data to the central without requiring a request.

BLE Packet Format
A BLE packet consists of multiple fields, each serving a specific purpose. While the exact format may vary depending on the type of packet (advertising, data, control, etc.), a typical BLE packet follows this general structure:\
1. Preamble (1 Byte)
- A fixed sequence used for synchronization between the transmitter and receiver.
- Typically, it is 0xAA or 0x55, depending on the PHY layer used.
2. Access Address (4 Bytes)
- A unique 32-bit address identifying the connection.
- For advertising packets, this is always 0x8E89BED6.
- For data packets, this is a random address assigned during connection establishment.
3. Header (2 Bytes)
The header contains control information about the packet and consists of:
- Type (4 bits): Indicates whether the packet is advertising, data, or control.
- RFU (2 bits): Reserved for future use.
- Length (6 bits): Specifies the size of the payload in bytes.
- Other Flags (4 bits): Used for various control and flow mechanisms.
4. Payload (Variable, 0-255 Bytes)
- The actual data being transmitted.
- In GATT transactions, this can include characteristic values, notifications, and other relevant data.
- For advertising packets, this contains device name, UUIDs, and other advertising information.
5. CRC (3 Bytes)
- A Cyclic Redundancy Check (CRC) value used for error detection.
- Calculated over the entire packet (except the preamble).
- Ensures data integrity during transmission.
While BLE follows a general packet format, it is important to understand that each BLE device is unique, and the exact structure of its packets can vary significantly.
|  Preamble  | Access Address |  Header  |   Payload   |   CRC   |
|   1 Byte   |   4 Bytes     |  2 Bytes |  0-255 Bytes |  3 Bytes |
BLE Device Documentation: Services and Characteristics
Since each BLE device is unique, manufacturers typically provide detailed documentation that describes the device’s services, characteristics, and data format. This documentation is essential for developers who need to communicate with the device correctly.
Why is the Manual Important?
- Defines Available Services: Lists all GATT services the device supports (e.g., Heart Rate Service, Battery Service, or custom services).
- Describes Characteristics: Specifies what data each characteristic holds, whether it is readable, writable, or notifiable, and the expected data format.
- Explains Data Encoding: Details how values are structured (e.g., byte order, units, scaling factors).
Lets get into Android BLE
When developing BLE applications on Android, many developers rely on Nordic Semiconductor’s BLE SDK instead of the default Android Bluetooth API. Nordic’s SDK provides a more stable, optimized, and developer-friendly way to interact with BLE devices
We are going to implement an Android BLE feature step by step. First, we will begin by setting up the necessary permissions and ensuring that the device supports Bluetooth Low Energy (BLE). Then, we will initialize the BluetoothAdapter to interact with the BLE hardware.
Next, we will scan for available BLE devices and establish a connection with the desired peripheral. Once connected, we will discover the services and characteristics of the device, allowing us to read and write data.
Throughout the process, we will handle various scenarios such as connection failures, timeouts, and errors. We will also implement notifications and indications to receive updates from the peripheral.
By the end of the implementation, we will have a fully functional BLE feature in the Android app, enabling communication with BLE devices in a reliable and efficient manner.
Scanner Implementation
- Add Dependency to build.gradle.kts
dependencies {
    implementation("no.nordicsemi.android:scanner:1.6.0")
// Check for the latest version
}- Permissions Required in AndroidManifest.xml for Android 12+:
<uses-permission android:name="android.permission.BLUETOOTH_SCAN"/>
<uses-permission android:name="android.permission.BLUETOOTH_CONNECT"/>
<uses-permission android:name="android.permission.ACCESS_FINE_LOCATION"/> <!-- Needed for older versions →- Request Runtime Permissions for Android 12+:
if (Build.VERSION.SDK_INT >= Build.VERSION_CODES.S) {
    requestPermissions(arrayOf(
        Manifest.permission.BLUETOOTH_SCAN,
        Manifest.permission.BLUETOOTH_CONNECT
    ), REQUEST_CODE)
}
Start Scan function
private fun startBleScan() {
        val settings = ScanSettings.Builder()
            .setScanMode(ScanSettings.SCAN_MODE_LOW_LATENCY) // Fast scanning mode
            .setReportDelay(0) // Notify devices immediately
            .build()

        val filters = listOf(
            ScanFilter.Builder()
                .setDeviceName("MyBLEDevice") // Optional: Filter by device name
                //.setServiceUuid(ParcelUuid(UUID.fromString("0000180D-0000-1000-8000-00805F9B34FB"))) // Filter by specific service
                .build()
        )

        val scanner = BluetoothLeScannerCompat.getScanner()
        scanner.startScan(filters, settings, scanCallback)
    }
Scan Callback
private val scanCallback = object : ScanCallback() {
        override fun onScanResult(callbackType: Int, result: ScanResult) {
            Log.d("BLE", "Device found: ${result.device.address} - RSSI: ${result.rssi}")
        }

        override fun onBatchScanResults(results: MutableList<ScanResult>) {
            for (result in results) {
                Log.d("BLE", "Batch Device: ${result.device.address}")
            }
        }

        override fun onScanFailed(errorCode: Int) {
            Log.e("BLE", "Scan failed: $errorCode")
        }
    }
Explanation of the Code:
- ScanSettings: Configures the scanning mode (LOW_LATENCY for fast detection).
- ScanFilter (Optional): Filters devices by name or by service UUID.
- BluetoothLeScannerCompat: Uses Nordic’s library to handle scanning.
- ScanCallback: Receives detected devices and logs their MAC address and RSSI.
Connection Example
// Scanning callback
    private val scanCallback = object : ScanCallback() {
        override fun onScanResult(callbackType: Int, result: ScanResult?) {
            result?.let {
                val device = it.device
                val deviceName = device.name
                val deviceAddress = device.address
                Log.d("BLE", "Device found: $deviceName ($deviceAddress)")

                // Add the device to the list if not already added
                if (!discoveredDevices.contains(device)) {
                    discoveredDevices.add(device)
                }
            }
        }

        override fun onScanFailed(errorCode: Int) {
            super.onScanFailed(errorCode)
            Log.e("BLE", "Scan failed with error code: $errorCode")
        }
    }

    // Function to start scanning for devices
    fun startScan() {
        val scanner = BluetoothLeScanner(context)
        val settings = ScanSettings.Builder().setScanMode(ScanSettings.SCAN_MODE_LOW_LATENCY).build()
        val filters = listOf<ScanFilter>() // Add filters if needed (e.g., by service UUID)
        scanner.startScan(filters, settings, scanCallback)
    }

    // Show a list of discovered devices and allow the user to select one
    fun showDeviceList() {
        val deviceNames = discoveredDevices.map { it.name ?: "Unnamed Device" }
        val builder = AlertDialog.Builder(context)
        builder.setTitle("Select a BLE Device")
        builder.setItems(deviceNames.toTypedArray()) { _, which ->
            val selectedDevice = discoveredDevices[which]
            connectToDevice(selectedDevice)
        }
        builder.show()
    }

    // Connect to the selected device
    private fun connectToDevice(device: BluetoothDevice) {
        selectedPeripheral = BluetoothPeripheral(context, device)

        // Start the connection process
        selectedPeripheral?.connect(context)
            ?.useAutoConnect(false) // Disable auto connect for manual control
            ?.retry(3, 1000) // Retry 3 times with 1-second delay if the connection fails
            ?.done { peripheral ->
                Log.d("BLE", "Connected to ${peripheral.name}")
                // Proceed with discovering services or interacting with the device
            }
            ?.fail { status ->
                Log.e("BLE", "Connection failed with status: $status")
            }
            ?.enqueue()
    }
Steps in the Code:
Scan Callback (scanCallback):
- The onScanResult() method listens for discovered devices and adds each device to the discoveredDevices list if it’s not already there.
- The onScanFailed() method handles errors during the scan process.
Start Scanning (startScan()):
- startScan() initializes the BLE scanner and starts scanning for nearby devices with a low-latency scan mode.
Show Device List (showDeviceList()):
- Once devices are discovered, the showDeviceList() method creates an AlertDialog to present the user with a list of available devices.
- When the user selects a device, the corresponding BluetoothDevice is passed to the connectToDevice() method.
Connecting to a Device (connectToDevice()):
- After the user selects a device, the connectToDevice() method connects to the selected device using the Nordic SDK’s BluetoothPeripheral.
The connection attempts are retried 3 times with a 1-second delay if they fail.
Connection Observer
ConnectionObserver provides callbacks that notify the state of the connection, including when the device is connected, disconnected, the connection fails, or if bonding is required
// Initialize the connection observer
    override fun onDeviceDisconnected(peripheral: BluetoothPeripheral) {
        Log.d("BLE", "Device disconnected: ${peripheral.name}")
        // Handle device disconnection, maybe restart scanning or show a message to the user
    }

    override fun onDeviceConnected(peripheral: BluetoothPeripheral) {
        Log.d("BLE", "Device connected: ${peripheral.name}")
        // Handle device connection, e.g., start discovering services
    }

    override fun onConnectionFailed(peripheral: BluetoothPeripheral, status: Int) {
        Log.e("BLE", "Connection failed: ${peripheral.name}, Status: $status")
        // Handle connection failure, possibly retry the connection
    }

    override fun onBondingRequired(peripheral: BluetoothPeripheral) {
        Log.d("BLE", "Bonding required for: ${peripheral.name}")
        // Handle pairing request if the device requires bonding
    }

    override fun onBonded(peripheral: BluetoothPeripheral) {
        Log.d("BLE", "Device bonded: ${peripheral.name}")
        // Handle successful bonding if needed
}- In the connectToDevice() function, we set the ConnectionObserver by calling it.setConnectionObserver(this) on the BluetoothPeripheral instance.
- The observer will then listen for connection changes and handle the respective callbacks.
fun connectToDevice(device: BluetoothDevice) {
        peripheral = BluetoothPeripheral(context, device)

        peripheral?.let {
            // Adding the ConnectionObserver to the peripheral
            it.setConnectionObserver(this)

            // Connect to the peripheral and handle auto-connect and retries
            it.connect(context)
                .useAutoConnect(false)  // Disable auto-reconnect
                .retry(3, 1000) // Retry 3 times with 1 second delay
                .done { peripheral ->
                    Log.d("BLE", "Successfully connected to ${peripheral.name}")
                    // Start discovering services, etc.
                }
                .fail { status ->
                    Log.e("BLE", "Connection failed with status: $status")
                }
                .enqueue()
        }
    }
Implementing GATT Services and Characteristics
class MyBleManager(context: Context) : BleManager(context), ConnectionObserver {

  private var peripheral: BluetoothPeripheral? = null
  private var myService: BluetoothGattService? = null
  private var myCharacteristic: BluetoothGattCharacteristic? = null

  companion object {
        private val SERVICE_UUID = UUID.fromString("0000180D-0000-1000-8000-00805F9B34FB") // Example: Heart Rate Service
        private val CHARACTERISTIC_UUID = UUID.fromString("00002A37-0000-1000-8000-00805F9B34FB") // Heart Rate Measurement Characteristic
    }

    override fun getGattCallback(): BleManagerGattCallback {
        return object : BleManagerGattCallback() {
            override fun initialize() {
                Log.d("BLE", "GATT initialized")
            }

            override fun isRequiredServiceSupported(gatt: BluetoothGatt): Boolean {
                Log.d("BLE", "Checking GATT services...")

                // Find the required service in the device
                myService = gatt.getService(SERVICE_UUID)
                if (myService == null) {
                    Log.e("BLE", "Required service not found!")
                    return false
                }

                // Get the characteristic within the service
                myCharacteristic = myService?.getCharacteristic(CHARACTERISTIC_UUID)
                if (myCharacteristic == null) {
                    Log.e("BLE", "Required characteristic not found!")
                    return false
                }

                Log.d("BLE", "Service and characteristic found!")
                return true // Indicates the required services were found
            }

            override fun onServicesInvalidated() {
                Log.d("BLE", "Services invalidated, clearing references")
                myService = null
                myCharacteristic = null
            }
        }
    }
Explanation of the Code:
- UUID Definitions
- SERVICE_UUID: Identifies the required GATT service (example: Heart Rate Service).
- CHARACTERISTIC_UUID: Identifies the characteristic within the service.
- Method isRequiredServiceSupported()
- This method is automatically called after the device connects.
- It searches for the required GATT service using gatt.getService(SERVICE_UUID).
- Then, it retrieves the characteristic within that service using getCharacteristic(CHARACTERISTIC_UUID).
- If both the service and characteristic are found, it returns true; otherwise, it returns false.
- Method onServicesInvalidated()
- This method is triggered when the connection is lost or the device disconnects.
- It clears the references to myService and myCharacteristic.
Read/Write Characteristic:
// Function to read from the characteristic
    fun readData() {
        if (readCharacteristic != null) {
            readCharacteristic(readCharacteristic)
                .with(DataReceivedCallback { device, data ->
                    Log.d("BLE", "Received data: ${data.value?.contentToString()}")
                })
                .fail { device, status ->
                    Log.e("BLE", "Failed to read characteristic, status: $status")
                }
                .enqueue()
        } else {
            Log.e("BLE", "Read characteristic not available")
        }
    }

    // Function to write to the characteristic
    fun writeData(value: ByteArray) {
        if (writeCharacteristic != null) {
            writeCharacteristic(writeCharacteristic, value)
                .done { device ->
                    Log.d("BLE", "Data successfully written: ${value.contentToString()}")
                }
                .fail { device, status ->
                    Log.e("BLE", "Failed to write characteristic, status: $status")
                }
                .enqueue()
        } else {
            Log.e("BLE", "Write characteristic not available")
        }
    }
Simple Notification/Indicate Characteristic
// Function to enable notifications
    fun enableNotifications() {
        if (notificationCharacteristic != null) {
            setNotificationCallback(notificationCharacteristic)
                .with(DataReceivedCallback { device, data ->
                    Log.d("BLE", "Notification received: ${data.value?.contentToString()}")
                })

            enableNotifications(notificationCharacteristic)
                .done {
                    Log.d("BLE", "Notifications enabled")
                }
                .fail { device, status ->
                    Log.e("BLE", "Failed to enable notifications, status: $status")
                }
                .enqueue()
        } else {
            Log.e("BLE", "Notification characteristic not available")
        }
    }
The enableNotifications() method in the Nordic BLE SDK is used to enable notifications for a given BluetoothGattCharacteristic. When notifications are enabled, the BLE peripheral (device) automatically sends data updates to the mobile device whenever the characteristic value changes, without requiring explicit read request
- enableNotifications(characteristic) enables notifications for a characteristic.
- setNotificationCallback(characteristic).with { device, data -> … } registers a callback to handle incoming data.
Notification/Indicate Characteristic with Data Merger
Why Use DataMerger?
Some BLE characteristics send data in chunks instead of a single packet. The DataMerger helps combine multiple notifications into a single complete dataset before processing it.
Imagine we need to remove headers from each packet that we are receiving.
Custom DataMerger Class
class HeaderRemovingDataMerger : DataMerger {
    override fun merge(data: MutableList<ByteArray>, lastPacket: ByteArray?): ByteArray? {
        lastPacket?.let {
            // Remove the first 2 bytes (header) from each packet before merging
            val cleanPacket = it.drop(2).toByteArray()
            data.add(cleanPacket)
        }

        // Merge all received packets into a single byte array
        return data.flatten().toByteArray()
    }
}
Use the Custom DataMerger in the BLE Manager
 // Function to enable notifications using custom DataMerger
    fun enableNotifications() {
        if (notificationCharacteristic != null) {
            setNotificationCallback(notificationCharacteristic)
                .merge(HeaderRemovingDataMerger()) // Use custom merger
                .with(MergingDataCallback { device, data ->
                    Log.d("BLE", "Merged Data (Header Removed): ${data.value?.contentToString()}")
                })

            enableNotifications(notificationCharacteristic)
                .done {
                    Log.d("BLE", "Notifications successfully enabled")
                }
                .fail { device, status ->
                    Log.e("BLE", "Failed to enable notifications, status: $status")
                }
                .enqueue()
        } else {
            Log.e("BLE", "Notification characteristic not available")
        }
    }
How This Works
- HeaderRemovingDataMerger Class
- Implements DataMerger to handle merging of BLE packets.
- Removes the first 2 bytes (header) from each packet.
- Merges the cleaned packets into a single byte array.
- Using HeaderRemovingDataMerger in enableNotifications()
setNotificationCallback(notificationCharacteristic)
    .merge(HeaderRemovingDataMerger()) // Custom merger to remove headers
    .with(MergingDataCallback { device, data ->
        Log.d("BLE", "Merged Data (Header Removed): ${data.value?.contentToString()}")
    })
The received packets are processed, header removed, and then merged
Example Scenario
Incoming Packets from BLE Device:
Packet 1: [0xA1, 0xB2, 0x10, 0x20, 0x30]
Packet 2: [0xA1, 0xB2, 0x40, 0x50, 0x60]
After HeaderRemovingDataMerger Processing:
Final Merged Data: [0x10, 0x20, 0x30, 0x40, 0x50, 0x60]
Final Thoughts
In this guide, we explored how to implement BLE communication in Android using the Nordic BLE SDK. From scanning and connecting to a device, enabling notifications, and handling fragmented data with DataMerger, we covered essential steps to build a reliable BLE application.
Nordic’s SDK simplifies complex BLE operations, ensuring a smooth and efficient development process. Whether you’re working with sensors, IoT devices, or firmware updates, mastering these concepts will help you create robust BLE applications.
App Solutions Studio
Start your journey with our App Solutions Studio. Seize the opportunity to bring your mobile app to life and embark on your development journey with our App Solutions Studio.